WebCam under Linux
![]()
This document is about using a webcam "Logitech QuickCam Pro 4000" on both Debian (Sarge) and SuSE Linux. The camera can be used with the driver 'pwc' for Philips webcams.
For 'SUSE 10' I got a link from Peter from the Netherlands on 27 Nov 2005, which I have not tested but may be useful for you: http://www.novell.com/coolsolutions/feature/16340.html.
0. Newest Update for Kernel 2.6.x ! (See below for kernels 2.4.x)
There are lots of discussions about the drivers 'pwc' and 'pwcx' for the newest
kernels (kernel 2.6 and higher) going on these days.
Here is a solution that worked for me without building a new kernel - just
making a new kernel module working fine on Debian Linux with kernel 2.6.7 !
This solution should also work for other 2.6 kernels; I guess.
a) Goto http://www.saillard.org/pwc/
b) Click on README - you will read (and this is true, I verified it) that you may really have a big resolution of 640x480 !
c) Save/download the tar-ball pwc-10.0.6a.tar.bz2 to any directory
   and enter the following commands:
d) tar -jxvf pwc-10.0.6a.tar.bz2
e) cd pwc-10.0.6a
f) make     (ignore the two error-messages)
g) cp -p /lib/modules/2.6.7-1-686/kernel/drivers/usb/media/pwc.ko /lib/modules/2.6.7-1-686/kernel/drivers/usb/media/pwc.ko_orig
h) cp -p pwc.ko /lib/modules/2.6.7-1-686/kernel/drivers/usb/media/pwc.ko
   !! Should the command 'uname -r' on your system not result in '2.6.7-1-686',
      then you should use your own output of the command 'uname -r' instead
      of '2.6.7-1-686' in the two commands above !!
i) depmod -a
j) rmmod pwc
k) modprobe pwc
(I also tested this procedure with kernel 2.6.10 and it worked!)
See also on http://www.lavrsen.dk/twiki/bin/view/PWC/
*Note*: With this new driver 'pwc' you do *not* need the driver 'pwcx' anymore -
with this new driver of Luc Saillard
you just have everything in one driver!1. Introduction
This page is divieded into 5 sections: 1. Introction, 2. xawtv, 3. webcam, 4. The driver pwcx, and 5. motion .
The most important thing before connecting (or even buying) a web cam under
Linux is to make sure that an appropriate driver for the digital camera exists.
Search Google for appropriate information.
Valuable information about webcams under Linux is available on the page http://www.smcc.demon.nl/webcam/faq.html (such as questions "Which webcam should I buy", etc.).
My first try with a "Logitech QuickCam Messenger" failed - this camera cannot
be used under Linux. However, the "Logitech QuickCam Pro 4000" works perfectly
under Debian (we have 'Sarge' running here) and SuSE Linux 8.2 (under 8.1 I was
not successful, so I upgraded
all the SuSE machines to be connected to this webcam to SuSE8.2).
The QuickCam Pro 4000 is availabe for about $100, Euro 100, or CHF 150.- in
larger stores.
First, install xawtv (Video4Linux) from the installation DVD (some other packets will automaticall be installed as well) or via apt-get (Debian).
Second, (under SuSE) install v4l-tools from the installation DVD; this set of
programs includes the software 'webcam', which is easy to use and allows to
shoot a picture at regular intervals but also whenever a trigger-threshold is
reached.
Under Debian, install 'webcam' with apt-get.
Under Debian, I also installed v4l-conf, but now I am not quite sure anymore,
whether this package is really needed.
Should you prefer to install a more sophisticated program, the software 'motion' can be recommended: It continuously monitors the area observed by the webcam and whenever motion is detected, images are saved. The program also can (at the same time while it is surveilling an area) create regular snapshots.
2. xawtv
Important for Debian users: You may get a message that 'permission to
/dev/video0 is denied'! So you have (as root) to change the permission of your
video-device-files: chmod o+rw /dev/video0; chmod o+rw /dev/video1.
In addition, I made an entry for the user who wants to use the video devices
in /etc/group: add the user name in the line starting with 'video'. However,
this alone did not help and the permissions of the device files had to be
modified.
'xawtv' is great to make tests with the webcam. Just connect the webcam to the
USB connector of your PC and enter 'xawtv'. Now you will most probably see a
green image on the screen. Just make the window with the greenish image a
little bit smaller (by clicking on a corner of the image). Then you will see a
small picture with a live image of your webcam. For a larger picture you need
to install the driver pwcx (see below).
So far, I did not use xawtv extensively and therefore I cannot give detailed
information about it.
3. webcam
In order to use the program 'webcam', you should first read the approriate man-page (enter: man webcam) and then create a file called .webcamrc in your homedirectory. Read the manpages carefully and follow its directions. In my case, where I wanted continuous monitoring of an area with my webcam, I used the following parameters (do not use the option "input = composite1" as given in the man pages; enter the command v4lctl list to view a list of possibilities; in my case the command input = Webcam" was ok.):
# .webcamrc
[grab]
#Kernel 2.4#device = /dev/video0
#For Kernel 2.6.7 we had to modify this to video1 :
device = /dev/video1
text = Home %d-%b-%Y %H:%M:%S
##infofile = filename
fg_red = 255
fg_green = 255
fg_blue = 255
# With the new pcw-driver (see on top of this page) even 640x480 is possible!
width = 320
height = 240
delay = 10
wait = 1
input = Webcam
norm = pal
rotate = 0
top = 0
left = 0
bottom = -1
right = -1
quality = 75
trigger = 180
once = 0

[ftp]
host = www
user = webcam
pass = xxxxxx
dir  = public_html/images
file = webcam.jpeg
tmp  = uploading.jpeg
passive = 1
debug = 0
auto = 0
local = 1
ssh = 0
Should you want to transmit the picture through SSH, you have to set ssh = 1 and you also have to store your public key of your machine, where the webcam is installed, to the host, where the picture is beeing sent to; otherwise you would have to enter the password on the host's machine whenever you are transferring an image!
Please note, that the values for the image size (320x240) cannot be used without
the driver pwcx - so if you do not have this driver, use the values for 'width'
and 'height' as given in the example above.
New update (see on top of this page): higher resolutions now *are* possible
using the new 'pwc-driver'!!
If you get error messages such as:
reading config file: /home/foo/.webcamrc
ioctl: VIDIOCMCAPTURE(frame=0;height=120;width=160;format=4): Invalid argument
ioctl: VIDIOCMCAPTURE(frame=0;height=120;width=160;format=7): Invalid argument
ioctl: VIDIOCMCAPTURE(frame=0;height=120;width=160;format=13): Invalid argument
video4linux webcam v1.5 - (c) 1998-2002 Gerd Knorr
grabber config:
  size 320x240 [12 bit YUV 4:2:0 (planar)]
  input Webcam, norm pal, jpeg quality 75
  rotate=0, top=0, left=0, bottom=240, right=320
then you specified width and height with too large numbers and have not installed the pwcx driver (see below). And: Make sure you have the directory 'images' under 'public_html' (below your home directory) existing.
4. The driver pwcx
For images with a larger resolution you should install the driver pwcx.
Information is available under
http://www.smcc.demon.nl/webcam/philips.txt and you may download the driver from
http://www.smcc.demon.nl/webcam;
more exactly on
http://www.smcc.demon.nl/webcam/release.html#pwcx.
I downloaded the version PWCX 8.2.2, which comes in a tarfile pwcx-8.2.2.tar.gz
and which contains drivers for a variety of processors and kernels. For
SuSE 8.2 take the driver in usb-pwcx-8.2.2/x86/gcc-3.2, which is called
pwcx-2.4.20.o .
This driver (pwcx-2.4.20.o) also works under a Debian GNU Linux with the
kernel 2.4.26-1-686 !
As root copy this file in the kernel modules directory:
cp pwcx-2.4.20.o /lib/modules/2.4.20-4GB/kernel/drivers/usb/.
Should you have kernel 2.4.26-1-686, then of course the command above should
be:
cp pwcx-2.4.20.o /lib/modules/2.4.26-1-686/kernel/drivers/usb/pwcx-2.4.20.o
In order to load the driver module pwcx automatically into the kernel, as soon
as pwc is loaded, you need to do the following:
Debian
cd /etc/modutils
Create a file 'pwcx' with the following content:
# For the webcam:
#
post-install pwc /sbin/insmod --force /lib/modules/2.4.26-1-686/kernel/drivers/usb/pwcx-2.4.20.o >/dev/null 2>&1
Then enter update-modules; this will create a new /etc/modules.conf
(you should not modify this file manually), where the contents of the newly
created file /etc/modutils/pwcx will now be contained.
Under Debian, also add the following lines into the file /etc/modules :
 # for webcam:
 pwc
SuSE
But now you will have to load this module manually into the kernel by:
On Debian: insmod -f /lib/modules/2.4.26-1-686/kernel/drivers/usb/pwcx-2.4.20.o or
On SuSE: insmod -f /lib/modules/2.4.20-4GB/kernel/drivers/usb/pwcx-2.4.20.o or
This description of how to install 'pwcx' enables you to get images from your Logitech QuickCam Pro 4000 with a resolution of 320x240 pixels, using either the programs 'webcam' or 'motion'; with the new driver explained on top of this page, even resolutions up to 640x480 are possible!
5. motion
The monitoring program I currently use is 'motion'. A description can be found
on http://motion.sourceforge.net/,
where you also may download the program.
On SuSE, I downloaded the latest stable version 3.0.6 and installed it (as root) with
cd motion-3.0.6; ./configure; make; make install
Debian users simply install with: apt-get install motion
Before using this program, I highly recommend to carefully read the
comprehensive information provided by Kenneth Lavrsen on his web-page
http://www.lavrsen.dk/sources/webcam/motion_guide.htm
In my case, where I want a snapshot every minute and continuous monitoring of an outside area, I use the following file motion.conf in my homedirectory:
# motion.conf   28Jul2003 / uk
#
# next line only if you want to run the program continously in the background!
daemon on
#
height 240
width 320
#
target_dir /home/user/public_html/images
threshold 150
# Min. 60 seconds pause in detected motions, before the next event is declared:
gap 60
# Draw a frame around the area where motion has been detected:
locate on
# 1 sec gap between each shot while detecting motion:
minimum_gap 1
# Write the number of pixels that changed compared to the reference frame:
drawtext_changes on
# Write this text in the lower left corner of the image:
drawtext_user HOME_1
#
# In addition to the motion monitoring, make a snapshot every 60 seconds:
snapshots 60
# keep the name of the snapshot always as lastsnap.jpg :
snapshot_overwrite on
You may want to experiment a bit: then use a lower threshold than 150 and
start the program with "motion -C" and look at the console, what 'change values'
you receive.
Please note, that moving shadows, bushes and trees have a large effect on
the motion detection. The same is true for dawn, when the daylight is
going away quite quickly.
For this reason I still use the option "drawtext_changes on" (writes the
change value on the image) in order to get information of what the program
does.
Of course you understand, that I cannot display current images of the webcams monitoring our home - however, here is an older image of a test installation:
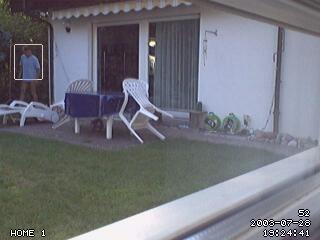
As you can see, the person approaching our garden is detected immediately and the frame around the body of the person is produced by the software 'motion', indicating, where on the image motion is detected. And of course, many more pictures are saved while the person is walking around in front of our house.