Setup of the SED Laptop: Dell Inspiron 8200 with Linux
![]()
Preface
The Dell Inspiron 8200 was my first laptop with Linux on it. The laptop works fine and has a large screen, but it is rather heavy! Meanwhile I mainly use a Sony Vaio VGN-T1XP when travelling, because it has much less weight (and Debian GNU/Linux on it!).
Requirements
Our goal was to setup a laptop with Win2000 and Linux, which would allow to
easily clone the internal disk, so in case of a disk crash we can just
replace the internal disk and then copy the complete and configured
operating system to the new replaced internal disk.
The laptop should be able to use wireless LAN (WLAN) both under Win2000 and
Linux.
For most cases, the laptop should be used after booting into Linux and then
either use its software or Micro$oft software by using VMwareWorkstation-3.2
(with the needed software installed).
The laptop should be able to also boot directly in Win2000, in order to cover
special cases, where Linux possibly would not be able to support special
hardware and also to allow a modem connection to our office, using the internal
(presumably) WinModem (thanks to Sarah Huber for this idea).
Well, meanwhile the internal Modem also runs under Linux, thanks to Sarah.
Setup of the internal disk
The internal disk has a capacity of 40 GB (actually about 37 MB). We would have preferred the 60 GB version, but since the unpluggable second disk is available as 40 GB version only and given the fact, that we wanted to produce clones, we opted for the 40 GB internal disk.
Configuration:   Partition     Space Filessystem  Mountpoint
               - primary        2 GB    FAT32       /dos
               - primary        8 GB    FAT32       /windows/C
               - primary       62 MB    Ext2        /boot
               - extended
               -   logical    1.6 GB    swap
               -   logical   the rest   ReiserFS    /
                             ~ 26 GB
The partitions were created using the SuSE Linux installation DVD (thank to
Uwe Riek
for this idea) and Linux was then first installed on the 3rd primary
and the extended partition. Before installing Win2000 on the second partition,
we have set the 1st partition, so that Win2000 would 'not see' it
(Uwe's idea).
fdisk /dev/hda t 1 83 w and: using the togle command 'a', make sure, only the 1st partition has a boot '*'.Then Win2000 was installed on the 2nd partition.
Use the command 'p' to see a list of the partitions.
And: After the installation of Win2000 set the 1st partition with the command 't' back to the hex-value of 'c' !
- Boot the laptop with a Win98 boot diskette
- copy *.* c:
- sys c:
Once this setup of partitions is completed, we have to install a boot loader in order to be able to boot into DOS, Win2000 or Linux. Since Win2000 overwrites the Master Boot Record (MBR), we simply insert the Linux Installation DVD and boot the laptop. Choosing 'Installation' and the appropriate language, we then select 'Boot an installed Operating System' and Linux will boot fine. Then we edit the boot loader configuration file. We used Lilo for the past few years, but have now changed to Grub, the default boot loader for SuSE Linux 8.1 (see below, why we used SuSE 8.1).
Our file /boot/grub/menu.lst looks as follows:

gfxmenu (hd0,2)/message
color white/blue black/light-gray
default 0
timeout 8

title linux
   kernel (hd0,2)/vmlinuz root=/dev/hda6  hdb=ide-scsi  vga=788 apic
   initrd (hd0,2)/initrd
title Windows 2000
   root (hd0,1)
   makeactive
   chainloader +1
title Dos / data
   root (hd0,0)
   makeactive
   chainloader +1
title failsafe
   kernel (hd0,2)/vmlinuz.shipped root=/dev/hda6 ide=nodma apm=off acpi=off vga=normal nosmp maxcpus=0 disableapic 3
   initrd (hd0,2)/initrd.shipped
title memtest86
   kernel (hd0,2)/memtest.bin
title floppy
   root (fd0)
   chainloader +1

The boot loader 'grub' is written into the MBR of the internal disk with the command:
         grub-install /dev/hda
With this setup of the disk we can boot and choose, whether to bootCloning the windows partition
When booting into DOS, there are some error messages coming, but finally we are in C: and may enter 'ghost.exe' and then clone the windows partition from the internal to the external disk or vice versa. Remember, win2000 is on the second partition of the disks. For cloning the entire disk, see the description below.
Cloning the entire disk
In order to make a complete copy from the internal to the external disk, we
suggest the following procedure:
- Insert the external disk from the front side on the left ;-)
- Boot with a SuSE Linux CD or DVD
- Choose 'Rescue System'
- login as root (no password required)
- cp /dev/hda /dev/hdc to copy the internal to the externel disk
- cp /dev/hdc /dev/hda to copy the external to the internal disk
- shutdown -h now
You cannot boot from the external disk, because the boot loader 'grub' wrote
into the MBR of the internal disk, that the boot information is on this (the
internal) disk. On the cloned copy of the external disk the same information
is now available, so it will actually boot on the internal disk.
So use your external disk for a complete backup of the internal disk. If
the internal disk should brake or if you destroy your operating system, you
can always restore the complete disk from the external disk.
In order to not have the DOS- and Win-partitions always mounted on boot, we modified two lines in the /etc/fstab:
/dev/hda1   /dos         vfat   defaults      0 0       <-- old
/dev/hda1   /dos         vfat   noauto,user   0 0       <-- new

/dev/hda2   /windows/C   vfat   defaults      0 0       <-- old
/dev/hda2   /windows/C   vfat   noauto,user   0 0       <-- new
This enables each user, to mount these partitions. They should then also be unmounted after use! For newbies to Linux: this should also be done, whenever you have mounted a floppy disk!
Configuring the Touch-Pad In the file /etc/X11/XF86Config we added the following:
Section "InputDevice"
  Driver       "mouse"
  Identifier   "Mouse[4]"
  Option       "Device" "/dev/psaux"
  Option       "Emulate3Buttons" "on"
  Option       "Name" "Autodetection"
  Option       "Protocol" "ps/2"
  Option       "Vendor" "Sysp"
EndSection
And later in the section "ServerLayout" we added the following line:
InputDevice "Mouse[4]" "SendCoreEvents"With this, the touch-pad may be used and from then on you may use both the mouse and/or the touch pad (however, a new login may be necessary).
Everything in blue color: To be completed......

We started with SuSE Linux 8.0 and installed drivers and ACU-software from
Cisco - without success. After installing SuSE 8.1 the PCMCIA stuff was solved
automatically and we just spent several hours to find out how things work
having both wired and wireless LAN... (see below). It's easiest, if you use
the 'profile management' now provided by YaST2.

wired and wireless LAN...

setup of the Aironet 350

Info on the LED status of the Cisco Aironet 350 wireless Lan adapter:
http://www.cisco.com/univercd/cc/td/doc/product/wireless/airo_350/350cards/linux/instlcfg/icglchp8.htm#30614

Installing the previously bought StarOffice6.0 for SuSE Linux 8.0 under 8.1 :

sux -

cd /media/cdrom/i386/update/8.0/pay9
yast2 -i so_base.rpm so_de.rpm

...this needs some time!

See also on:
http://sdb.suse.de/de/sdb/html/hmeyer_prooffice_81.html (in German)

http://sdb.suse.de/en/sdb/html/hmeyer_prooffice_81.html (in English)


--> However, I think that Staroffice actually is not needed anymore, since
Open-Office seems to be the same program - if I'm wrong, please contact me.

Read the beginning of http://www.seismo.ethz.ch/linux/vpnclient.html, the very end of part 4 and part 5, when using the laptop.
I recommend, to *always* first start VPN before starting work on your laptop,
if you are using any nay networking services (SSH, WWW).

How the ACU-Software was downloaded from Cisco and installed on /opt/cisco

How the setup for the setup for the Cisco Aironet 350 has been done:
(- set channel in file /etc/sysconfig/network/wireless)
(--> now, it seems to work even without this entry of the channel-no.)
- set 'Network Type' to 'Infrastructure' using the ACU
- in YaST2 - Network/Basis - Configuration of your Network Card
  set the PCMCIA wireless card, set the operation mode (Betriebsmodus)
  to 'managed' ('verwaltet'), not 'Ad-hoc'

Switching between the LAN- and WLAN-Profiles....

LAN profile (or LAN-DHCP profile):
   disconnect Aironet 350
   connect LAN cable
   start YaST2 control center
   select 'System' - 'Profile Manager' - 'LAN-Profile' (or LAN-DHCP profile)
     and confirm questions...

W-LAN profile (or WLAN-DHCP profile):
   disconnect LAN cable
   connect Aironet 350
   start YaST2 control center
   select 'System' - 'Profile Manager' - 'W-LAN-Profile' (or WLAN-DHCP profile)
     and confirm questions...
   ... possibly you have to disconnect and to connect again your Aironet 350 ...

ATTENTION: This a possible source of problems! If you make some changes e.g. in
the file /etc/hosts (or other files, such as /etc/X11/XF86Config), these
changes have to be made again in all other profiles!!

- In order to allow a proper start of VMware Workstation 3.2, it was necessary
  to append the option 'apic' to the boot parameters; before, we got a
  'Speicherzugriffsfehler' after the start of a virtual machine.
  See http://sdb.suselinux.hu/de/sdb/html/fhassel_vmware_segfault81.html
  (in German)

- It was also necessary, to start vmware only in run-level 5, so samba is
started first. And, we made sure vmware is started after samba also in run-level
5 by setting the link in /etc/init.d/rc5.d from Sxxvmware to S99vmware.

With this it was possible, to link the Icon MyDocuments in Win200 under vmware
to the directory /home/user/EigeneDateien under Linux, thus allowing, that all
documents created under Win2000 and vmware are actually stored in a directory
accessible under Linux.

- In addition, we had to make sure that this works also, when not connected to
a LAN or WLAN. For this reason, we created a profile 'No-LAN' ('Ohne-LAN')
an just configured the network interface to a static IP-No. 192.168.0.7; this
profile has to be used when using the laptop and VMware while disconnected from
any connection to the Internet.
Everything in red color: To be translated and completed......
Profile
*******
Profil aendern:
Menueleiste: zweites Symbol von Links (Blitz)
        Administration/YaST2 (root Passwort eingeben)
        System/Profil-Manager
        -> gewuenschtes Profil waehlen (siehe unten)
        Umschalten auf ...
        OK
        Schliessen

- LAN-ETH-DHCP

- WLAN-ETH-DHCP
Wireless: dazu muss der VPN Tunnel gestartet werden.
Beim ersten mal vpn manuell starten und nethz Login und Passwort eingeben:
        vpnclient connect ethz
        (Login Passwort)
        vpnclient disconnect
Danach kann VPN ueber die Icons auf der Arbeitsflaeche ein und ausgeschaltet
werden.

- DialUp-ETH
Bei ersten mal muss das nethz Login eingegeben werden:
YaST2
Netzwerk/Basis
Konfiguration des Modems
Bereits konfigurierte Geraete (Modem ...): Aendern
Provider:
                Bearbeiten
                Beutzername eingeben (nethz Login)
oder    Hinzufuegen (neuer Provieder definieren, z.B. Dialup800)
(kinternet: Stecker rechts auf der Menueleiste. Mit rechter Maustaste:
Provider waehlen, Einwaehlen, Auflegen, Protokoll ansehen).
Bei Problemen, kann ein reboot (mit DialUp-ETH) helfen.

- ohne-LAN
mit fester IP Nummer, noetig um bei vmware-windows2000 auf 'EigeneDatein'
zugreifen zu koennen, wenn der Laptop nicht am ETH-LAN angeschlossen ist. Auf
das Verzeichnis 'EigeneDatein' kann auch von Linux aus zugegriffen werden
(/home/user/EigeneDatein).


Passwoerter
**************
samba und vmware-windows2000 username und passwort muessen identisch sein!

- samba (linux):
smbpasswd -a loginname
(neues Passwort eingeben)

- vmware-windows2000:
start/settings/control pannel
users and passwords
set password


Hostnamen
************
linux: hostname
samba: hostnamesmb
vmware-windows2000: hostnamevmw
windows2000: hostnamewin

hostnamesmb und hostnamevmw duerfen *nicht* gleich sein,

Der hostnamesmb ist in /etc/samba/amb.conf netbios name eingetragen.
Das vmware/windows2000 sucht hier das 'EigeneDateien':
        Tools/map networkdrive
        H:\\hostnamesmb\homes
Screen looks messy after cover was closed
If you close the cover for a while and open it again, the screen may be messed up if you run linux. There is an easy solution to get a nice screen again:
- Enter Ctrl/Alt F2 (change to a console)
- Enter Ctrl/Alt F7 and your screen comes back nicely after about 1 second.
Brief description on what's on the desktop
Below, you see how the desktop of our laptop looks like. The text in yellow color gives some explanations and will not actually appear on the desktop.
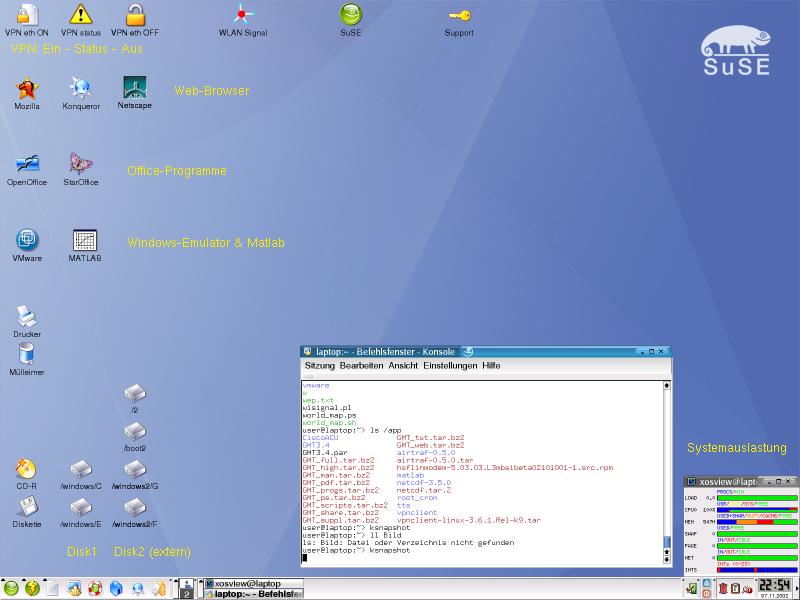
If you have an unsecure connection (WLAN, ADSL or Cable, LAN outside the ETH)
you really should first establish a VPN-connection to the ETH: Click on
'VPN eth ON'. A click on 'VPN status' gives you the status of your connection
and a click on 'VPN eth OFF' closes the VPN-tunnel.
The icon 'WLAN Signal' allows you to see how strong your signal on the wireless
LAN is. Do *not* register for SuSE-Support by clicking on the 'Support'-Icon
unless you have bought your own SuSE Linux 8.1 distribution.
The browser icons and the icons below (office-programs) should be
self-explanatory; I prefer Mozilla and Konqueror - Netscape has been included
for those of you, who really cannot live without it.
Clicking on the 'VMware-icon' displays a window, where currently you can click
on Windows2000 only. However, you may install any other Windows-OS if you like.
Should you have difficulties to get a connection to your Linux-directory
EigeneDateien in the Win2000-emulation under vmware, try the following:
- In a Linux-window enter as 'root': settime (and wait a while)
- Logout an reboot
The 'Matlab-icon' starts 'Matlab'. Please note, that you will need a connection
to the ETHZ in order to get a license from the license server. The command
'bench' will perform a bench mark test. You may want to verify, that the results
differ, if your laptop runs on battery and is not connected to
external power.
The icons 'CD-R' and 'Diskette' allow you, to mount a CD or a floppy. Please
remember to 'unmount' these devices, before logout. Especially remember,
to unmount the floppy before you physically take the floppy out of the drive.
Floppy is an old technology compared to CD: you could remove a floppy without
'unmounting' it, but you may have difficulties later... Therefore, before
removing such devices, do a right-click on the icon and choose
'Laufwerkeinbindung lösen', before removing the floppy/CD.
By the way: the program to use to burn CD's is called 'xcdroast'; you find
more explanations about its usage on my xcdroast-web-page
.
The icons for some partitions have the following meaning:
/windows/C The Win2000 partition on the internal disk
/windows/E The DOS partition on the internal disk; it may also be used
for data storage from both Win2000 and Linux.
The icons for 'Disk2' may only be used if you have the 'external' disk
plugged in. The names for these partitions have been chosen this way, because
this way they have the same names under Win2000 (Drive C, E, G, F) so you
should not be confused using them under Win2000.
Remember: Under Linux you may mount and work on all these partitions, if they
are physically present. However, under Windoze you may only 'see' the
windoze partitions - this Micro$chrott-OS is not able to 'see' and mount the
linux partitions.
On the bottom your KDE-Desktop there are a number of icons... try them
out in order to get used to KDE and Linux!
Online Update
One last thing: you should update your system regularly! Especially, you should update it after having installed new software, because there might already be a patch available. Updating your system is very easy:
- Make sure you have a connection to the internet ;-)
- On the bottom menu click on the second icon from the left
- Choose 'Administration' (on top) and move right and down to 'Yast2' and click
- Enter the root-password (you will be prompted for it)
- Click on 'Online-Update'
- Click on 'Weiter' (this now takes a while.......... a couple of minutes)
- You now get a new window, where normally you do not have to change anything,
  because the security patches and other necessary patches are selected
  automatically, depending on the software you have already installed.
  So, continue by clicking on 'Akzeptieren'
  --> your patches are now fetched and then installed
  (depending on the size and amount of patches, this takes some time, too)
- Click on 'OK' upon appearonce of the small window prompting you
- Click on 'Weiter'
- Close the YaST Control Center by clicking on 'Schliessen'
Your system is now fully patched and up-to-date.
If you have any further questions, ask a friend or google for your problem.